When it comes to the movement of materials, no piece of equipment is more commonly used than a Conveyor System. You will see that the packing lines and palletizers in our plant are highly dependant upon Conveyor Systems.
In discussing Conveyors we will look at:
- What They Do and What They Are
- Their Parts or Components
- How They Work
- Some Safe Work Practices
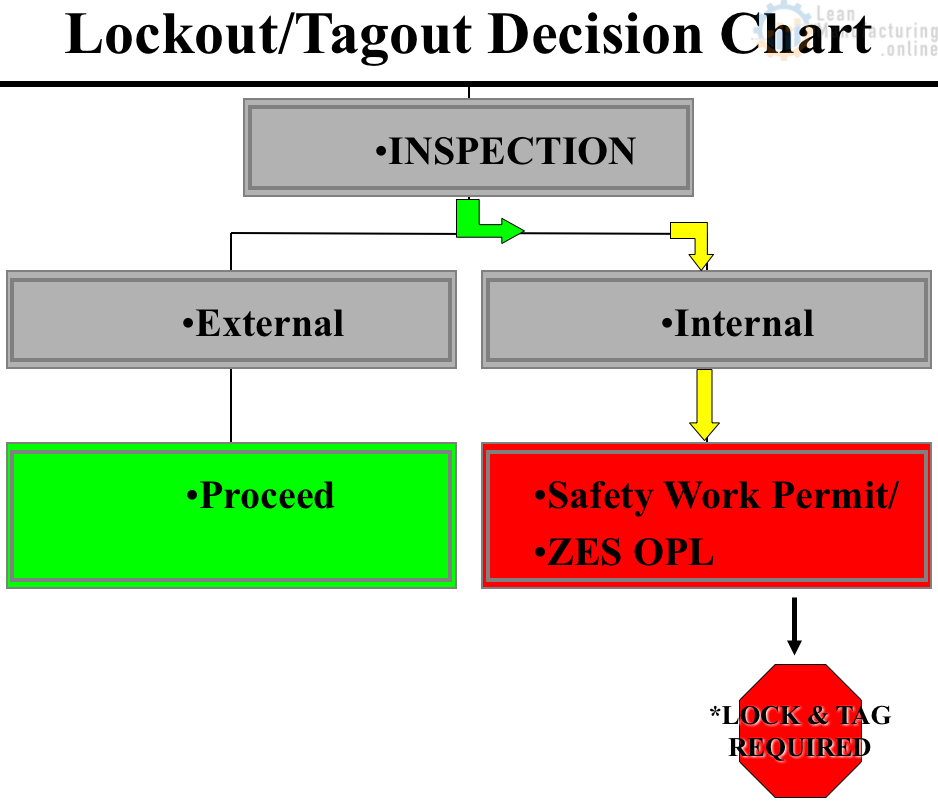
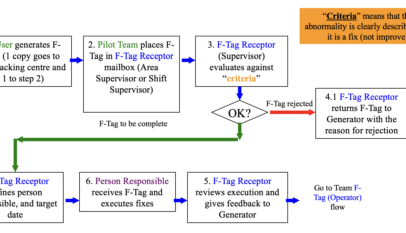
The Lockout/Tagout Decision Chart shows, in schematic form, the thought process we use before beginning potentially hazardous tasks. By asking “What Am I Doing?” you are determining the group your task falls into.
The groups are divided in areas:
1) change-over,
2) major work / replacement,
3) adjustment / troubleshoot,
4) inspection.
Having chosen inspection you follow the flowchart downstream from there.

Now, determine if you will need to be inside or under the equipment at any point while performing the procedure.
If, “No”, all work will be considered external, you may proceed. External work is work on the outside of equipment and guards in areas where there is no potential to be impacted if a piece of equipment were to start up unexpectedly.

If, “Yes”, you will be inside or under the equipment there MUST be a SAFETY WORK PERMIT or a Zero Energy State OPL for the equipment involved and you MUST achieve a Zero Energy State through proper Lock out / Tag out procedure before proceeding.
Internal inspection involves working on a piece of equipment or inside a guarded area. If you must open a guard door to access your inspection point, you are considered to be performing internal inspection. Another rule of thumb is that if you are outside of a guarded area but the inspection point is so configured that the unexpected startup of that piece of equipment could cause you harm, you must lock it out.
FIVE STEPS OF LOCKOUT/ TAGOUT
- Preparation and notification
- ID sources of energy (possibly electrical, pneumatic, hydraulic, chemical, gravitational or mechanical), notify affected persons, shut-down equipment.
- Locking and tagging
- Isolate energy sources, lock and tag sources, drain and bleed, sign and date tag.
- Verify lockout
- Test all start buttons, return to zero.
- Test all start buttons, return to zero.
- Release from lockout
- Job complete, equipment in safe condition, safe to restart.
- Equipment start-up
- Inform affected employees, verify guarding.
Conveyor Safety
- Riding on a conveyor of any type is prohibited.
- Before stopping or starting conveyors make certain no one is in a position to be hurt.
- Ensure that guards are properly installed.
- Refer to SOP’s and plant and department safety handbooks for more information.
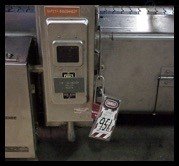
You may also refer to the Lockout/Tagout Safety OPL for that piece of equipment.
Part of your job responsibilities are to do equipment inspections………But I don’t know how to do an inspection. Are you sure, can you see, feel, hear and smell?
Don’t underestimate your diagnostic skills. You already do many of the tasks we will discuss.
If you SEE an oil leak, FEEL an overheating motor, HEAR a strange sound, or SMELL something burning you would take corrective action to prevent a future breakdown. An inspection program simply asks that you hone your skills and channel your findings into focused improvements.
What they do: Basic Conveyor Function
Lets review the theory of operation for conveyors, The basic function of a Conveyor System is to transfer material from one location to another.
Types of conveyor
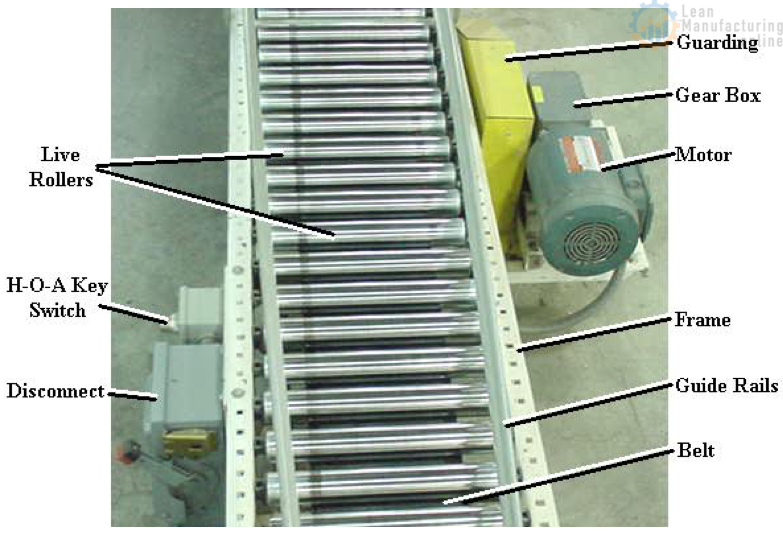
Live Roller Conveyors
Live Roller Conveyors consist of rollers similar to those used in belt conveyors turned by V-belts or bands. Often some of the rollers will be driven by the bands, the others spinning freely.
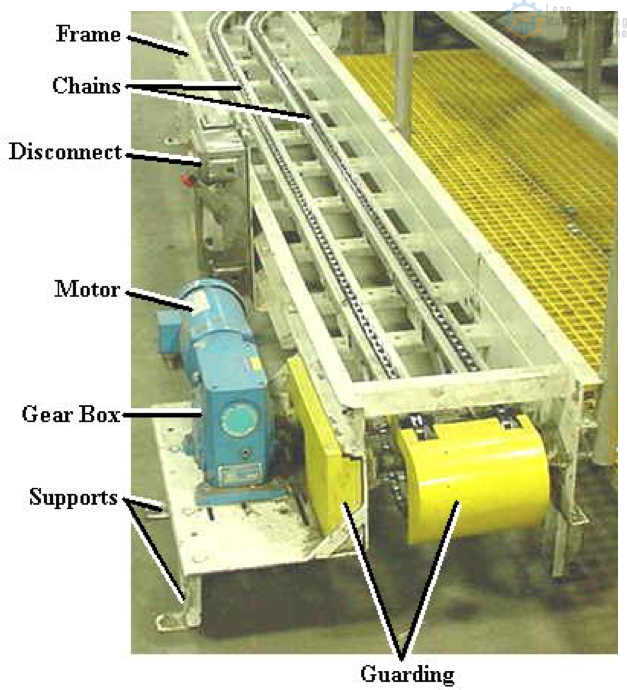
Chain Conveyors
Chain Conveyors work much like belt conveyors except that chains carry the materials. For this reason the material being carried must be solid.
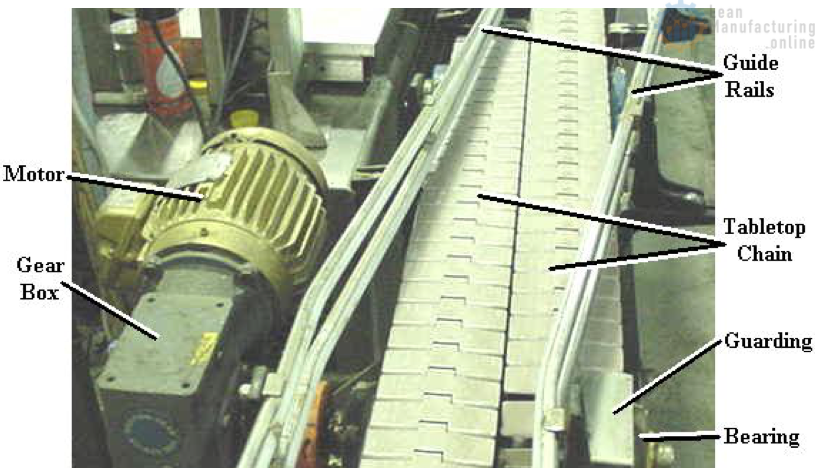
Tabletop Conveyors
Tabletop Conveyors use a plastic link chain to carry materials. The biggest advantage of Tabletop Conveyors is their ability to travel around curves.
Rubber Band Conveyors
Rubber Band Conveyors use O-rings (rubber bands) rotating in grooves to move materials, ex. empty bottles.

Belt Conveyors
Belt Conveyors use circular belts rotating between a Tail and Head Pulley (Roller) to move material from one location to another.

Parts and Components: Belt Conveyors
We will identify and define each of the major parts of a Belt Conveyor. Belt Conveyors are widely used in the production plant and many of their parts are found on other conveyor types.
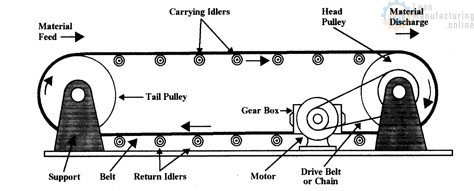
Parts of a Belt Conveyor: Material Feed
The Material Feed is the point at which the conveyor first receives the material or objects to be carried. The material can come from another conveyor or a point within the process.

The Conveyor Belt consists of two parts: the Carcass and the Cover. It is what the material being transferred actually rides on.
Tail Pulley is at the receiving end of the conveyor and is often but not always the Take-Up Pulley.
Head Pulley is at the discharge end of the Conveyor and is often but not always the Drive Pulley.
Carrying Rollers support the Belt and its load between the Pulleys.
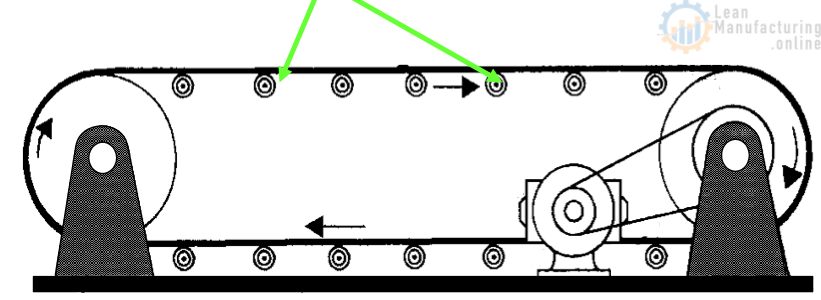
Supports are fabricated steel structures either mounted on the floor, suspended from the ceiling or mounted to a wall. Their main function is to position the Conveyor System where it is required. The Gearbox or Reducer changes the very high speed energy coming from the motor to a slower more powerful energy used to turn the conveyors. The Drive Belt or Chain transfers the energy from the gearbox to the drive pulley. The Material Discharge is the point at which the conveyor transfers the material or objects to another conveyor or a point within the process.
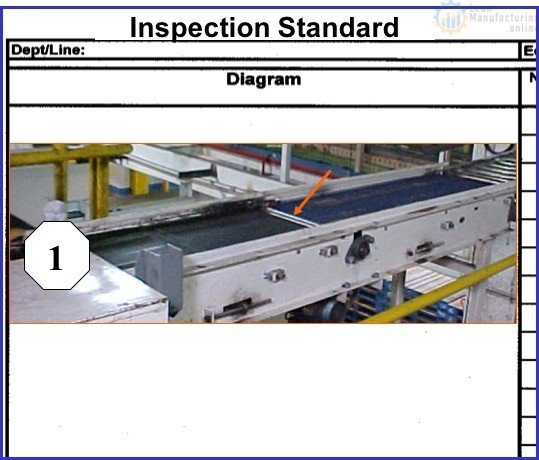
Parts and Components: Conveyor Support & Frame
Here we see an incline conveyor. This conveyor has a belt which has a drive motor to carry the cases up the rollers.

What are the things we observe during normal production runs?
- Any unusual noise
- A gear box or motor that is hotter than normal
- Any unusual vibration
- Strong burning smell
- Any oil or grease leaks
Forced Deterioration
- Forced Deterioration – occurs due to abnormalities in the equipment’s original specifications. Some of these are:
- high or low lubrication levels
- incorrect or less effective lubrication types
- changes to equipment because of jams
- changes to other external forces
Natural Deterioration
- Natural Deterioration – occurs with the normal aging of equipment, much like human beings
- minor wear to surfaces, both exterior and interior
- keeping welds and other connection points tight
- minor corrosion
Weak Point Parts
- Weak Point Parts – points on structure or equipment that are the first to fail.
- extend service life mechanism, structure, materials, shape and dimension accuracy, assembly strength, wear resistance, anti corrosion, surface roughness, capacity
- design to release excessive stresses
- stress in movement
What is an ABNORMALITY?
An ABNORMALITY is NOT a defect in a product. It is NOT underweights, the wrong color caps or labels.
An ABNORMALITY is a piece of equipment or condition that is out of spec. The result of the deviation from spec can lead to equipment breakdown and accelerated equipment deterioration.

Hearing an Abnormality
Operators have a working knowledge of the equipment on the lines. Without even realizing it they know what the equipment sounds like when it is running smoothly. Whenever, you hear noises that “just don’t sound right” it is better to have them checked out before a breakdown.
Seeing an Abnormality
Checking for roller and belt abnormalities during an inspection can involve looking for wear, cracks, breaks, looseness and tension.

Give a brief description of the problem and where the abnormality was found. Provide your name and the date. After completion of the tag, tear away the top copy and put in the department box. If there is no box, give to the supervisor or the TPM Promotional Office. Secure the tag to the machine making sure that it will not interfere with any moving parts of machinery or will not hinder the work area. Please remember to use RED tags for maintenance abnormalities, BLUE for operational, and YELLOW tags for safety related items. All abnormalities needs to be captures using F-tag system.
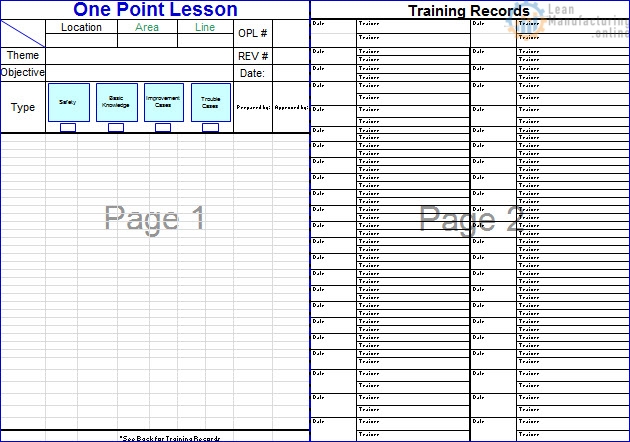
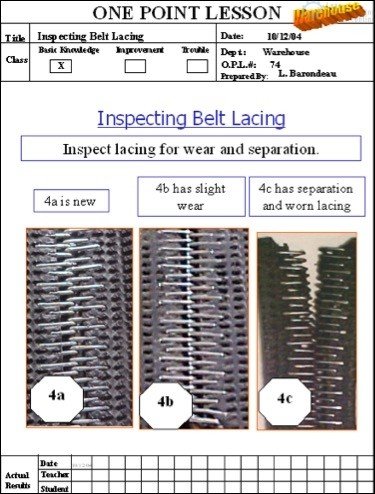
While the Autonomous Maintenance Standard will designate which inspections are to be done by operators it is One Point Lessons that outline the procedure.
One Point Lessons also give graphic interpretations of standards like what “GOOD” belt lacing looks like. By also showing a midpoint and a “BAD” example, it makes comparisons easier and less subjective. The midpoint allows you to catch problems before they go to failure. One Point Lessons are excellent, user friendly resources.
Feeling an Abnormality
Unusual vibration or heat coming from a motor or gear box can indicate an abnormality. Of course, these may be observed whether doing a formal inspection or not.
Also remember it isn’t necessarily the overheated or vibrating equipment that has the problem. It may be another piece of connected equipment.

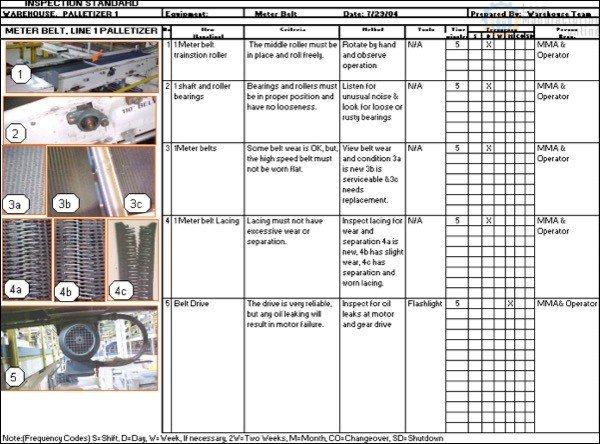
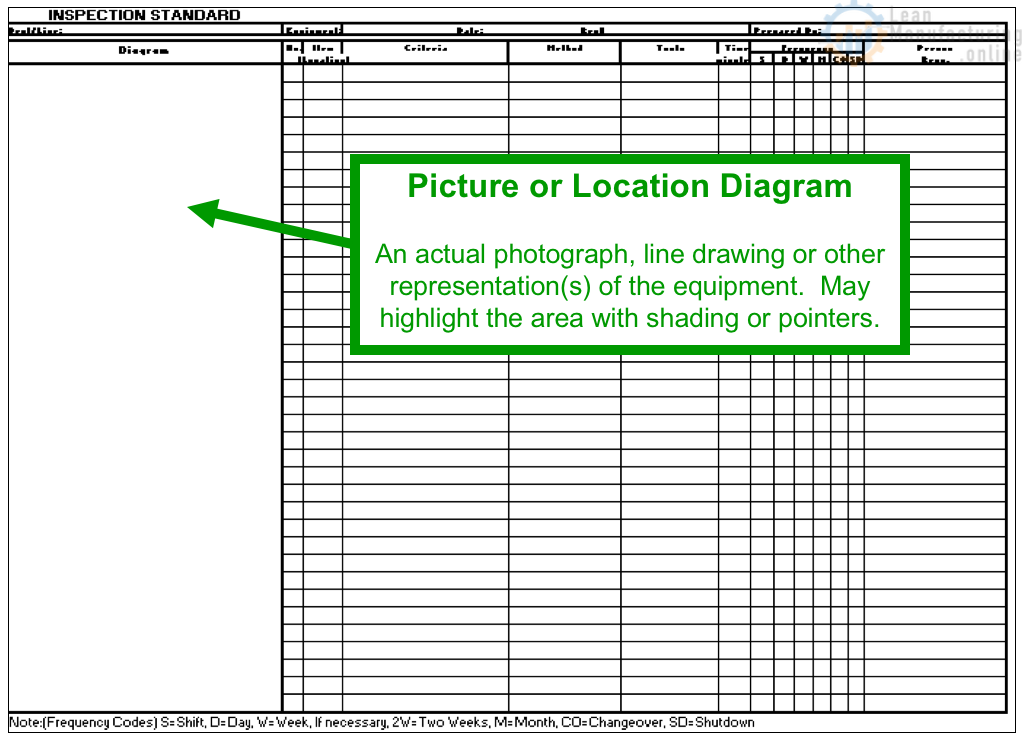
Parts and Components: Inspection Standard form
This is an example of an Inspection Standard. This is the form you use to convey what part of the equipment needs to be observed and inspected.

Here we see an Inspection Standard for belts. This happens to be a meter belt that can be found in Liquid Pack and the warehouse. This breaks down & shows what to look for, how to do the inspection and what you need to be able to inspect.
Anatomy of an Inspection Standard
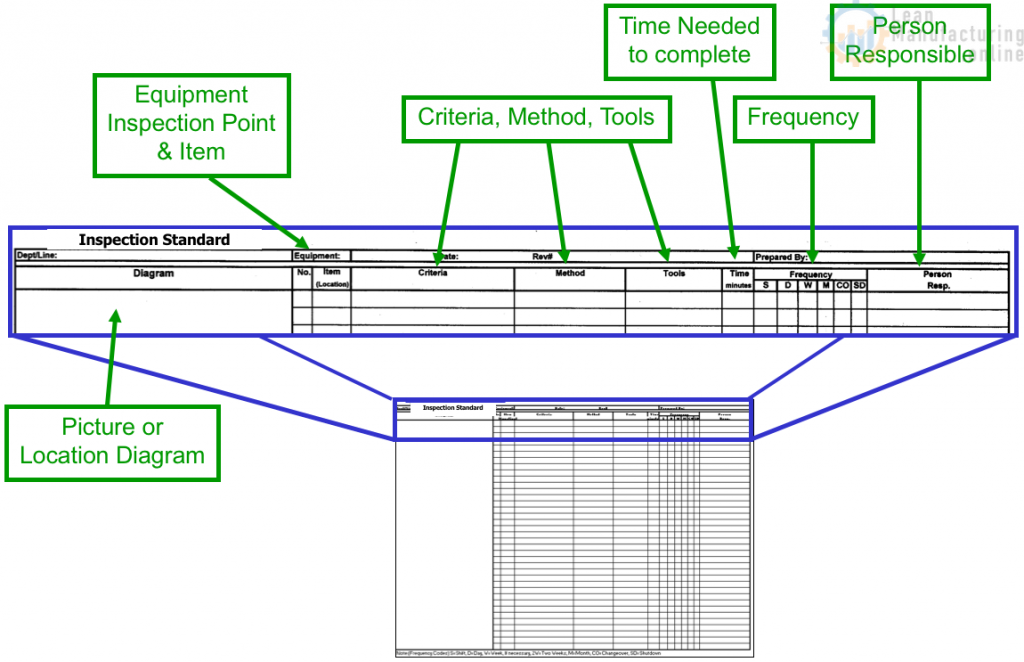
A large open ended space is available for a Picture or Location Diagram. Many inspection standards will include an actual photograph, line drawing or other representation(s) of the equipment. Some may highlight the area with shading or pointers.
The equipment number is simply a sequential identification of the inspection standards for each piece of equipment. The item is the equipment component or sub-assembly.

The criteria are the desired condition for each Inspection standard. For example, if you are checking the wear on belt lacing, the desired condition would be an objective, standard is always more desirable than a subjective standard.


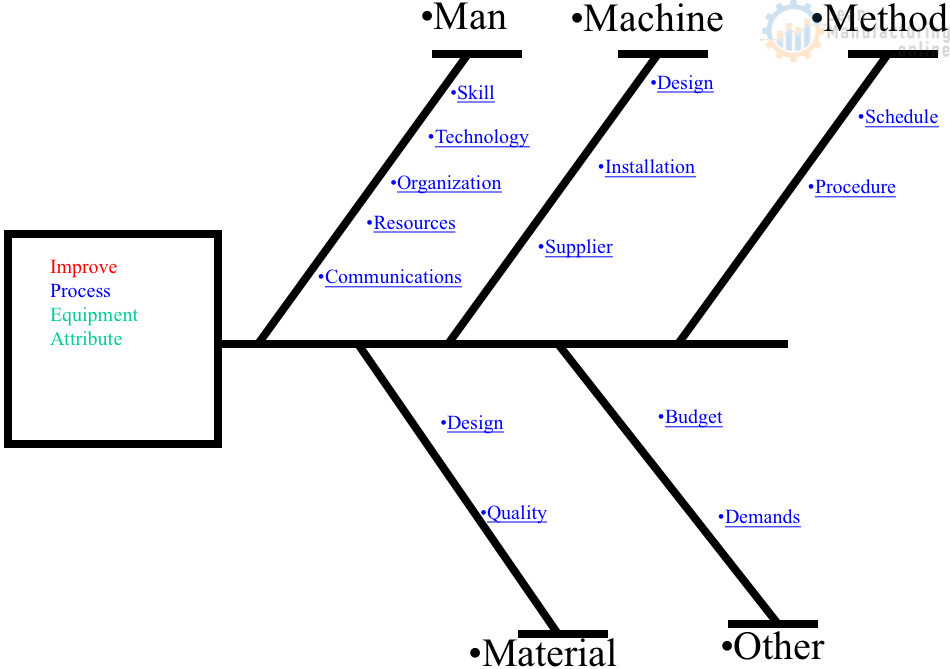
4M Analysis Process
The purpose of this procedure is to define the steps to do a 4M …