In this article, I will briefly run through the process of workload balancing; what is it, what does it do, and how do you do it? I will follow up that description with an actual case in a manual assembly process of a shutter used in an internet connector. It is a funny case because the results were quite amazing. Truth be told, the original process was just set up, and that is it! No thought was given to productivity or anything. We just need it done NOW, was the message from production. But still, the case shows the benefits you can get out of a bit of Lean thinking and good old industrial engineering thinking.
Workload balancing
The whole idea behind workload balancing is that if you look at a production line, more often than not, you will find that some people work more slowly than others. This can be caused by different things, but one of them (and often a missed one) is that the operator has more tasks than others on the line and therefore spends more time finishing their cycle. In other words, their cycle time is higher than the others in the process. To make sure that we are not producing too much in one end and waiting in the other end (because of the high cycle time) we try to balance the workload for the operators on the production line and thus making the cycle times more equal.
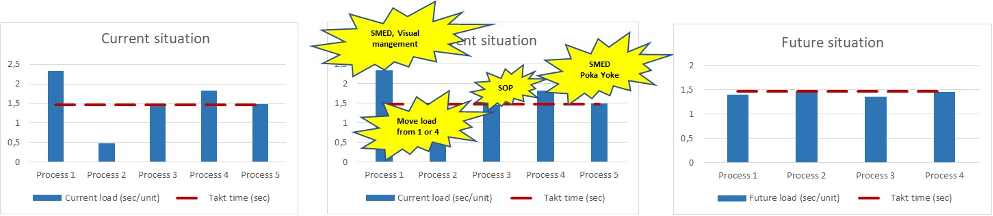
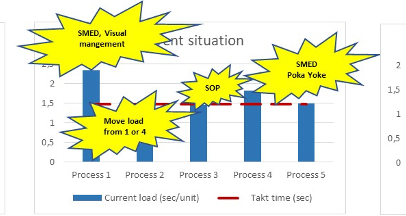
Let’s take a fictitious case where there are five processes with each their different workload and let the takt time be 1,4 sec. From the figure below, it is obvious that process 1 and process 4 lies well above the takt time, which means we will not be able to satisfy our customers within working hours. Processes 3 and 5 are more or less within takt time, whereas process 2 lies well below. Now the exercise is to observe the processes and then apply the appropriate Lean tools to the processes. For example, after observing process 1, it is decided that the change over time is too high and that the operators need visual help so they can make decisions themselves, and thus we pull out our SMED tool and also our Visual Management principles. In process 4, we observe high change over time but also a lot of fiddling when we need to put a jig into place, so we use SMED and a poka-yoke in connection with the changeover. In process 2, we look at work content in process 1 and maybe process 4 and pull out tasks that can be done in process 2. The result of all these exercises could be the last picture which depicts the future situation.
Real case of workload balancing but in a New Product Development environment
In this case, I will try to describe how I used the concept of workload balancing in a manual process where the operators had to assemble a part of an internet connector manually. It was in the starting phase of manufacturing this specific connector (a new product), so the first layout setup was just put up, and then the operators had a quick introduction to the work and then had to assemble the so-called “shutter” as well as they could. They worked over two shifts to get the required amount of ca. 1.600 shutters produced. The manning was not that well planned, and it was only temps who worked in the “cell.” There was a standard but not that easy to use, which to some extent explains the high cycle times observed in the current situation. But even though the manning was there, the operators did not seem to produce the amount expected.
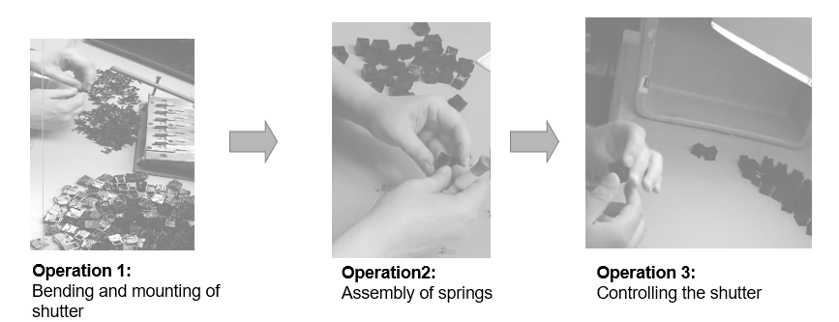
The takt time was 33 seconds, so it should not be a problem to reach that when you look at the cycle times for each operation. If we look at the workload pr. operation, it is clear that the assembly of springs (operation 2) is taking far more time than the other two operations.
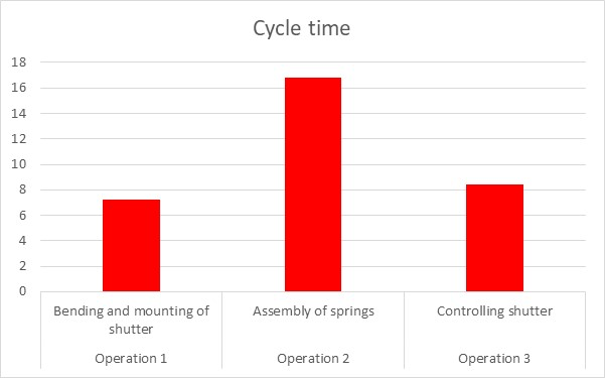
It was clear something was wrong! Even with only one operator pr. shift, we should be able to make the demand, but we did not! And because of that, we sometimes had to hire new temps that had to learn the process from their fellow colleagues. And then had to learn the process. We decided to video film the assembly process and, from that, do an MTM study (time study) to make sure we had the whole process mapped and calculated correctly.
So we did the MTM study from the video and rechecked it to ensure the numbers were correct. We decided to divide the process into four operations and on four different stations. The division was done from the time studies that showed something entirely different than the former observations, namely that the mounting of the springs did not take that long if you followed the new standard where you used a screwdriver.

We made new standards and trained the operators in the new layout and process. One of the problems with the original process was that there was no WIP control (control of the work that was in progress), so we implemented that too. That was a big challenge because the operator did not really know when to stop producing, and that was especially a challenge in the first operation: bending and mounting the shutter. We simply put in a piece of yellow tape which indicated that if the operator had filled up the box to that level, it would equal 500 pieces. On the yellow cloth, it says that there should be no more than two boxes filled (equaling 1.000 pieces)

In case the two bins are filled, the operator is instructed to stop working and then go to the last process (number 4) to see how they are keeping up and if that process is fine, go to process 3 to help out there etc. Until all processes are up to speed and an empty bin has been placed by the following operation (2 bin Kanban system). In the same way, the other operations had their WIP control, and all in all, the WIP would be around 2.000 pieces which is a visible improvement from the current situation where the WIP was 8.500 pieces.
The MTM study showed that with the new process, we could produce the required amount in just one shift and still make the takt time of 33 seconds.
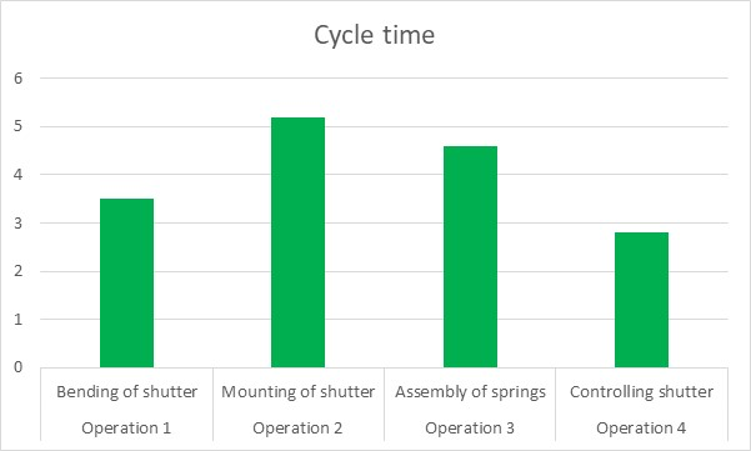
Due to the time study and some Lean work, none of the operations would take much more than 5 seconds. All in all, the process took almost only half of the original process, which took 32 seconds. The new standard process could produce a shutter in 16 sec!
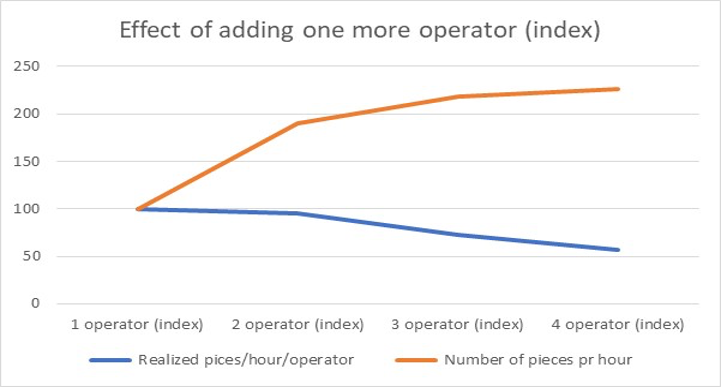
In the new process manning was more stable, and all operators were trained according to the new standard. But more often than not, we kept the number of operators to a minimum, that is, 2 operators and no more than 3 operators. This decision sprang from a study made when the new standard was up and running where it was clear that when we upped the manning, the number of pieces pr. operator pr. hour fell substantially. We were still in the NPD process so the demand was not yet as high as it would be later when the product matured.
The end result of this workload balancing exercise and the establishment of a real working cell was that we produced the amount needed in one shift with two operators (helping each other because of flexibility training), reduced the WIP by 70%, and equally reduced the Lead time from 1,5 day because of large batch production and inadequate planning in the cell down to 3,5 hour (more 75%). And more than that, we made the cell ready for a larger production volume as well.
I hope this case has shown you how my claim that Lean can be used in any industry and in any setting rings true. In this case, in the electrical circuit industry and in a new product development phase. If you found this interesting, you can find more cases and how I have applied Lean theory in practice on my blog “Thoughts from the Gemba” https://etorreshansen.wixsite.com/thoughtsfromthegemba


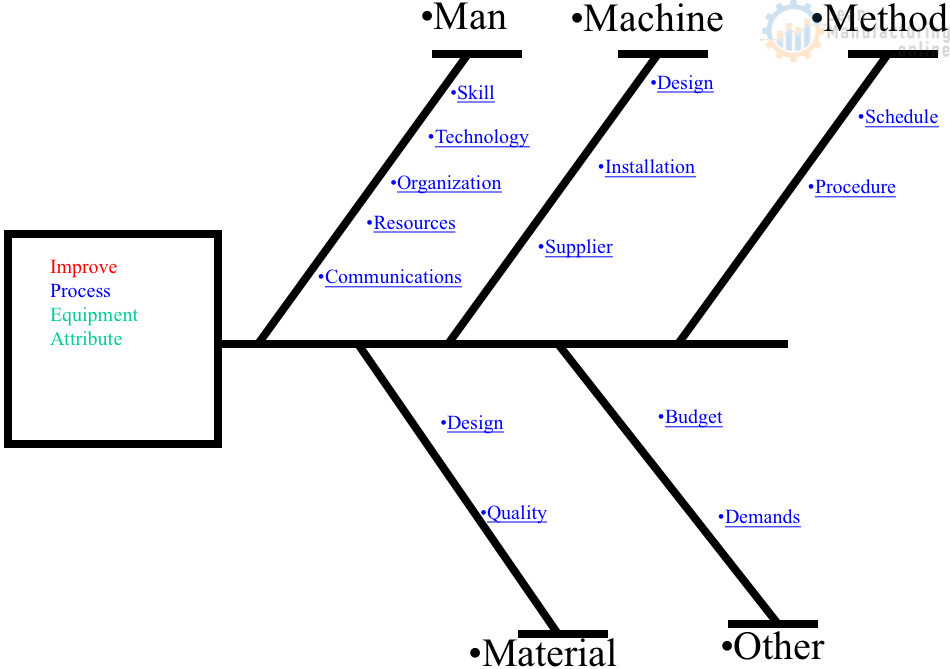
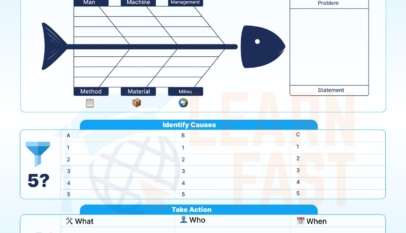
4M Analysis Process: Root Cause Guide for Manufacturing
Learn how to use 4M Analysis to find manufacturing root causes across People, Machine, Method, and Material with diagrams, examples, and checklist.