(1) Differentiate between internal and external changeover
External changeover tasks are those that can take place while the equipment is still in operation. They include preparations such as getting jigs and tools ready, preparing storage areas, trolleys, etc. for parts to be taken off the machine, pre-assembly and preheating. Internal tasks, in contrast, can only be performed with the equipment shut down (e.g. replacing parts, centering, and adjusting). When improving a changeover, it is essential to work out which of the tasks can be done externally and what has to be done internally and establish standardized procedures for carrying them out. (N.B. the terms ‘internal’ and ‘external’ were coined by Shigeo Shingo, a Japanese manufacturing expert who developed the concept of SMED, or ‘single-minute exchange of die’).
Someone watching a changeover will usually see many delays that the person performing the changeover does not perceive as problems – looking for a missing tool, for example, or going to fetch a bolt because the one at hand does not fit. Although the time wasted on each occasion might be as short as one or two minutes, it is essential to eliminate these delays, because the total time lost can be very great.
Changeover time can be substantially reduced by asking the following questions in advance and making the necessary preparations:
1 What preparations can be made before starting the changeover?
- What jigs and tools are needed?
- What parts are necessary? How many are needed?
- Are the parts to be installed in good repair?
- What type of workbench or work area is needed?
- Where should parts be placed after they have been removed?
The following three simple rules should be kept in mind in improving changeover:
- Don’t waste time looking for anything (materials, parts, tools, etc.).
- Don’t move around unnecessarily (position workbenches and storage areas so as to minimize movement).
- Don’t use the wrong tools or parts (using whatever tool happens to be at hand is a common cause of having to repeat the task).
Ensuring that these rules are followed requires faithful application of the industrial housekeeping principles known as the 5 Ss. These are seiri (sort), seiton (store), seiso (shine), seiketsu (standardize) and shitsuke (sustain).
Sort means sorting out what is needed from what is not, and disposing of anything unnecessary so as to free the area of clutter;
Store means working out the most efficient way of storing or positioning the tools and materials needed;
Shine means keeping them clean and ready for immediate use;
Standardize means establishing rules for ensuring that the first three Ss happen;
Sustain means rigorously following these rules.
Following these principles before, during and after changeovers will ensure that the necessary parts and tools are always stored in the designated place in the required numbers and that they are always ready for use, so that no time is wasted while the machine is not making product.
2 Separating internal and external setup tasks
The first step in improving a changeover is to examine the overall procedure as currently performed and answer the following questions:
- Which tasks should be external, and what sequence should they be done in?
- Which tasks should be internal, and what sequence should they be done in?
Each individual task should then be scrutinized, and the following questions answered:
- Is it really necessary?
- If it is currently necessary, is there any way of eliminating it?
- Is there any better way of doing it than the current one?
- Can it be simplified?
- Can it be integrated with another task?
- Can it be made more consistent?
- What improvements need to be made?
- What are the key points for performing it effectively?
The sequence in which the tasks are performed should then be examined, and the following questions answered:
- Can the current sequence be improved?
- Can any of the steps be combined?
- Should the steps be performed in a different order?
- Can any of the steps be performed in parallel?
Finally, the way in which the tasks are apportioned should be re-examined, and the following questions answered:
- Are the tasks divided up in the best way?
- Is the changeover being performed by the right number of people?
Implementing the improvements suggested by this line of questioning can reduce changeover time by 30% to 50%. Although separating external and internal tasks is a fairly elementary approach, it is surprisingly effective when combined with establishing clear procedures for individual tasks. If these two actions are done properly, the variability in changeover times can be considerably reduced.
The aims of improving changeovers in this way are to:
- Eliminate problems occurring after startup.
- Standardize changeover procedures so that anyone can complete them within a specified time.
- Identify any mechanical problems with jigs, tools and methods.
Like other improvements, changeover reduction must be implemented step by step. Making improvements at random, without following the procedure explained above, will not be very effective.
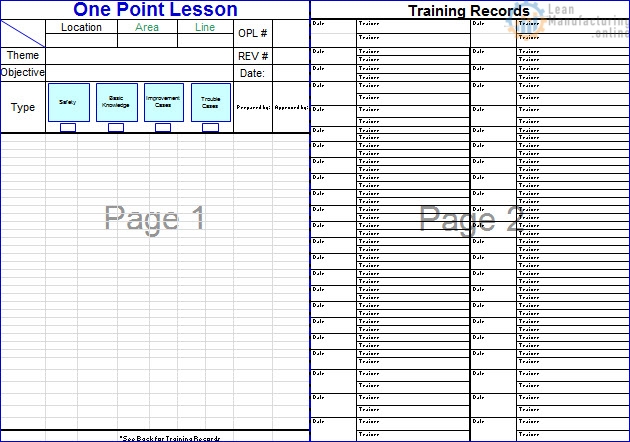
SMED Format templates are available here
(2) Convert internal tasks to external ones
Examining the tasks involved in a changeover and working out how to convert internal ones (ones performed with the equipment shut down) into external ones (ones performed while it is running) is a powerful method of reducing the changeover time.
For example, a jig that is usually changed, assembled, and adjusted while the machine is stopped can be pre-assembled while the machine is still operating, or parts that are usually adjusted on the machine can be adjusted offline using standard gauges. Methods such as the following can be used to convert internal tasks to external ones:
- Pre-assemble. Rather than installing several parts one by one while the machine is stopped, assemble them beforehand and replace the entire assembly.
- Use standard, quick-fitting jigs. Compare the shapes of the jigs used for different products and see whether any of them (or any part of them) can be standardised for use across the product range, and whether quick-release mechanisms can be incorporated that enable them to be replaced with a single action.
- Eliminate adjustments. Wherever possible, make adjustment an external task.
- Use intermediary jigs. Whenever a cutting tool is changed, it must be centered. However, the need for centering can be eliminated by setting the tool in a standard, high-precision intermediary jig which is installed on the toolpost instead of mounting the tool in the toolpost directly.
(3) Shorten internal tasks
Internal tasks themselves can often be shortened by using standard, quick-fitting jigs and better assembly and fastening methods, and by eliminating adjustments.
- Improve clamping mechanisms. Reduce the number of bolts, for example, or replace screw-type clamping mechanisms with hydraulic ones.
- Work in parallel. Two people working simultaneously can sometimes complete a changeover more efficiently than a single person performing one step at a time. Although timing and coordination are crucial to the success of this approach, changeover times can often be halved with the same number of labour-hours, even in the most difficult cases.
- Use the most appropriate number of workers, and allocate the tasks in the best way. Complex changeovers must sometimes be performed by dozens of people. In such cases, considering the following points can reduce setup and adjustment time drastically:
- What is the optimal number of workers for each task?
- How should the tasks be shared?
- What is the critical path for the changeover? What are the constraints preventing it from being shortened? (use of crane? labour resources?)
- What is the best way of using the labour available?
Table “Changeover Improvement Strategies” shows some examples of strategies for improving setup.

(4) Eliminate adjustments
Many adjustments can be converted into condition-setting; that is, setting the required conditions in one go, without the need for trial and error. First, all the current adjustments should be examined to determine whether they are avoidable or not by looking at what their purpose is, what gives rise to the need for them, what exactly they consist of, and how effective they are. The items that should be taken into consideration when doing this are explained below.
1 Purpose
Adjustments are usually performed for one or more of the following purposes:
- Positioning: adjusting height, or position on the X or Y axes (for example, setting a press die on a bolster and adjusting its height).
- Centering: centering cutting tools, workpieces, etc.
- Dimensioning: adjusting the depth of cut of a machine tool to achieve the specified dimensions, for example.
- Timing: adjusting the timing of various equipment mechanisms.
- Balancing: adjusting lateral pressure, balancing with set screws or springs, etc.
2 Cause
Adjustments are needed in the following circumstances:
(a) Accumulated errors
This is the most common reason why adjustments are needed when all the small individual errors in the equipment or the jigs and tools add up to produce a large error necessitating adjustment. Sometimes the error is just in the machine itself, but more usually it is a combination of the cumulative errors in the machine and the associated jigs and tools.
(b) Lack of standardization
Adjustment is required when there is insufficient standardization – for example, when reference surfaces are not set, dimensions are unquantified, the amount to be removed in one pass of a grindstone is not specified, etc.
(c) Insufficient rigidity
Even if everything is satisfactory when the machine is stationary, errors may be produced if the equipment flexes during operation because it is not stiff enough.
(d) Mechanical deficiency
Some mechanisms are designed to be adjusted by a human operator and would have to be redesigned to eliminate it.
3 Effectiveness
As stated earlier, right-first-time changeover produces a good product from the start, without the need for trial processing. This is radically different from the usual type of changeover, where the parts are changed, some product is produced and checked, adjustments are made based on the results of the checks, more product is produced and checked, further adjustments are made, and the process is repeated, usually at least two or three times, until the product satisfies the specifications. In the right-first-time changeover, the parts are changed and all the settings are mechanically locked into position, so that no adjustments are required, see below “Conventional Changeover and Right-First-Time Changeover”.

The effectiveness of adjustment tasks should be analyzed in order to determine whether they are really necessary or not (see Table and Figure “Analyzing Adjustment Effectiveness”). The procedure described below should be followed in doing this:
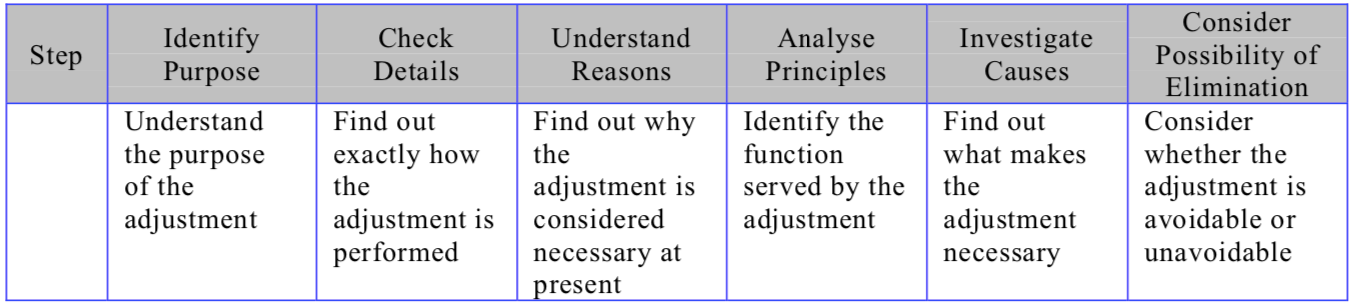
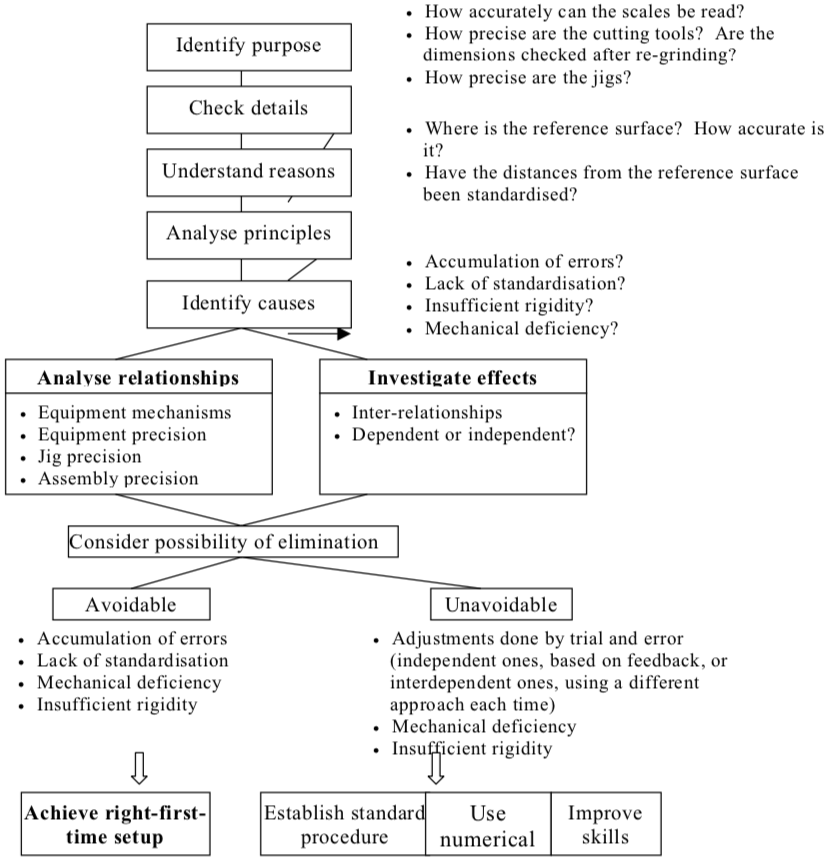
(a) Identify purpose.
Find out why each adjustment is being performed, and confirm the true purpose if it is unclear. Remember that some adjustments will have more than one purpose.
(b) Check details.
Find out exactly what the current adjustments entail (procedure, methods, standard values, number of repetitions, key points, the difference between coarse (initial) and fine (final) adjustments, clamping methods, adjustment mechanisms, reference surfaces, functions of adjustment (whether single or multiple) measurement methods, movement methods, interrelationships between adjustment points (whether independent or interrelated), etc.
(c) Understand reasons.
Use the insights gained in the preceding analysis to find out why each procedure is currently needed. Consider the operations individually and in groups, investigate the aims of each in detail, and list the apparent reasons for the procedures.
(d) Analyze principles.
Consider the principles behind the procedures and identify the real function served by the adjustment. For example, does it match heights, make a left and right parallel, level something, position something on the X and Y axes, or perform some other function?
(e) Investigate causes.
Use the results of the previous step to identify why the adjustment is necessary. Is the adjustment necessitated by an accumulation of errors, lack of standardization, insufficient, rigidity, mechanical deficiency, or something else? The need for adjustment may be due to one or more sets of circumstances.
(f) Consider possibility of elimination.
Finally, work out whether or not each adjustment is avoidable or unavoidable. Adjustments due to an accumulation of errors (in equipment, jigs and tools, or assembly) or to lack of standardization (reference surfaces unspecified, or distances from reference surfaces not standardized) are often avoidable.
(5) Improve unavoidable adjustments
If an adjustment cannot be eliminated, several strategies are available for making it more efficient:
1 Use numerical settings
Wherever possible, avoid adjustments by using discrete numerical settings. Where this cannot be done, consider what measuring methods could be used to eliminate the need for trial and error, or whether a substitute characteristic could be used for making the adjustment.
2 Establish a standard procedure
Establish a standard procedure for performing the adjustment and make sure all the steps are thoroughly understood. After each step, the person performing the adjustment should ensure that the correct result was produced and that the adjustment was within the correct range before proceeding to the next step. Also, consider how adjusting one part of the machine affects other parts, and look for ways of minimizing adjustment effects on other quality characteristics and making subsequent adjustments easier.
3 Improve skills
It is important to increase workers’ skills by having them practice the procedures. Repeating the tasks until they are embedded in the workers ‘muscle memories’ is the key to retaining them over long periods.
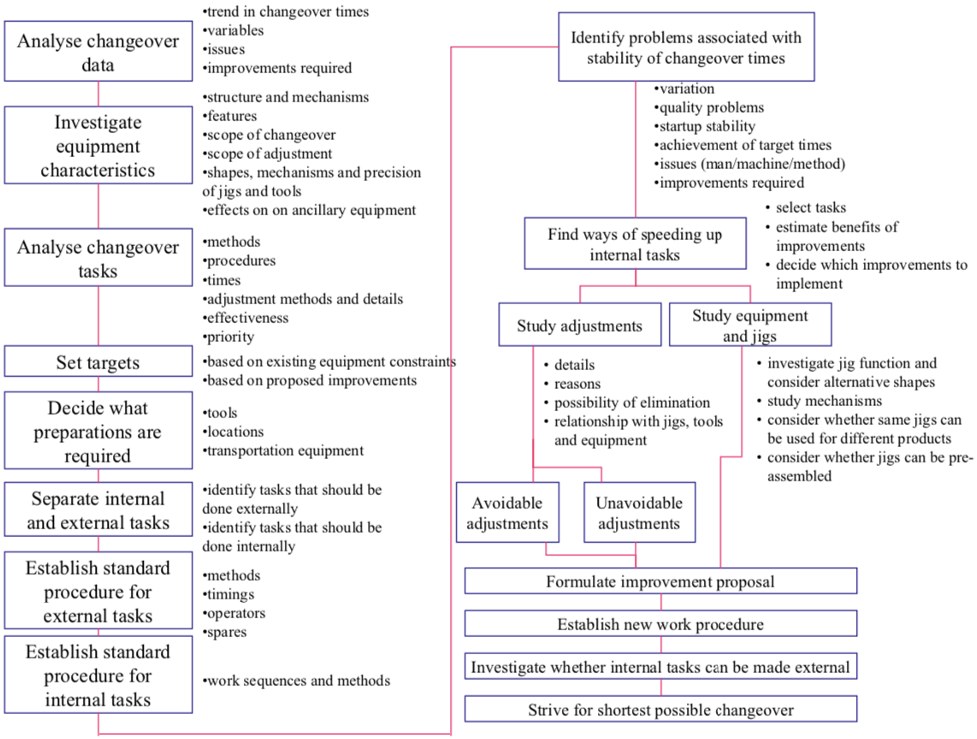
Changeover improvement procedure
Figure “Changeover Improvement Procedure” gives a systematic overview of the changeover improvement procedure.
SMED Format templates are available here


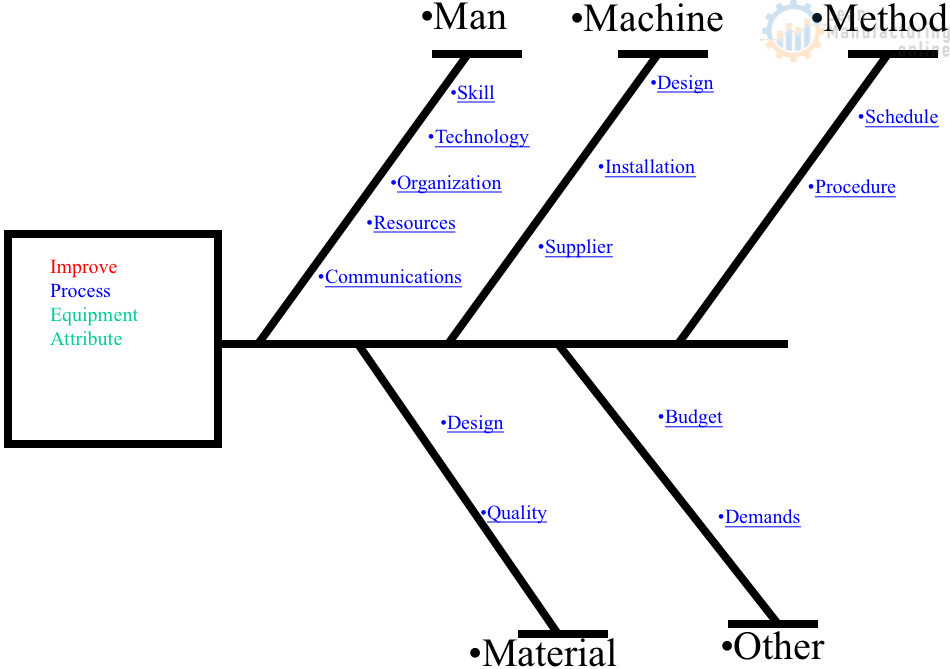
4M Analysis Process: Root Cause Guide for Manufacturing
Learn how to use 4M Analysis to find manufacturing root causes across People, Machine, Method, and Material with diagrams, examples, and checklist.