1. Autonomous Maintenance: the Basic Approach
1.1 What is Autonomous Maintenance?
(1) Operators should look after their own equipment
Autonomous Maintenance aims to create a scenario where all operators look after their own equipment, carrying out routine checks, oiling and greasing, replacing parts, doing simple repairs, spotting problems at an early stage, checking precision, and so on.
(2) Operators need to understand their equipment
Autonomous Maintenance can only be carried out by operators who are thoroughly conversant with their equipment. An operator’s work does not begin and end with the operation: it has to embrace maintenance as well.
The most important skill required of an operator is the ability to identify abnormalities and notice immediately when something is not quite right with the output quality or the equipment. This and the three other abilities operators need are listed below:
Operators need the ability to:
More specifically, each operator needs to acquire the ability to:
Operators who satisfy these requirements will have a ‘feeling’ for the equipment, and be sensitive to the subtle early-warning signs of defective output or failure. They will be able to discover the causes of problems and take action to forestall them. Then, and only then, can they be called ‘equipment-competent’.
1.2 The Basic Precepts of Autonomous Maintenance
As described above, the equipment has become increasingly sophisticated and complex, and the maintenance function has gradually become separated from the production function, with the result that production and maintenance departments have become isolated in their own camps, with one ‘making’ and the other ‘fixing’. This approach makes equipment much less efficient than it could be, and the need to remedy this culture has led to the emergence of the discipline known as ‘Autonomous Maintenance’, the basic precepts of which are listed below.
The basic precepts of Autonomous Maintenance:
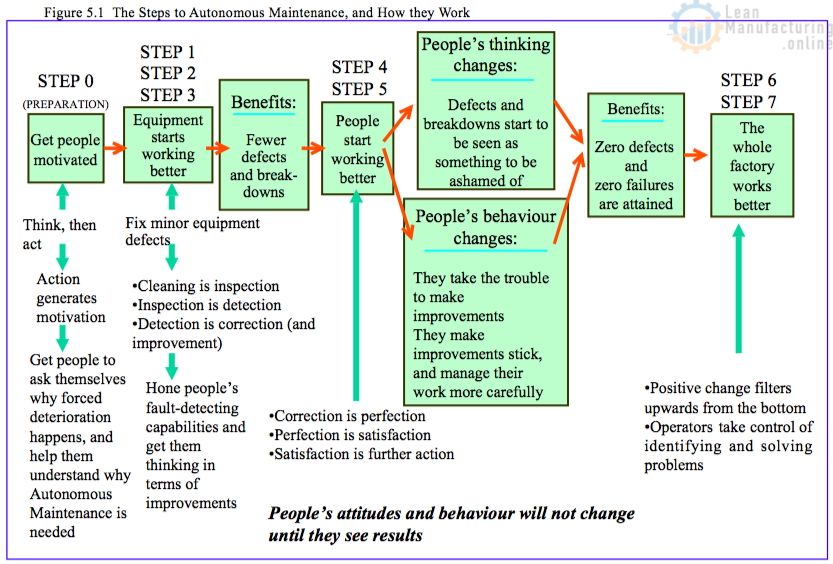
- The problems that stop equipment from working, or make it work less effectively, can be eliminated – in other words, zero-defect, zero-breakdown status can be attained – by changing the way everyone who works with the equipment, including the operators, thinks and behaves.
- When the equipment works better, the people work better, and when people work better, the whole factory works better.
- Autonomous Maintenance should be introduced step by step under the guidance of management, with each step implemented thoroughly. It should involve the whole workforce and empower each individual to fulfill his or her potential.
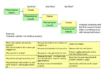
Figure 5.1 illustrates the steps to be followed in rolling out an Autonomous Maintenance program based on these precepts. The individual steps are described in more detail in Section 2 (‘Step-by-Step Development’).
Because of the situation described above, in which maintenance and production have become separate entities and the ‘I make, you fix’ mentality has pervaded the shop floor, many operators see themselves simply as ‘producers’, whose only contact with the equipment consists of keeping the process supplied with materials and performing quality checks.
Anything to do with caring for the equipment, even lubricating it and keeping it clean, is seen as the province of a specialist maintenance caste. The upshot is that operators disclaim all responsibility for the way their equipment is running; if a breakdown occurs, they blame the maintenance technicians for not doing their job properly, or claim that the company has chosen the wrong type of machine – the problem never has anything to do with them. This way of thinking has to be changed.
By persuading operators to do their bit, even if this just means tightening up nuts and bolts, and cleaning and lubricating the machinery, we can help to prevent equipment from failing. And if operators are encouraged to get in touch with their equipment in this way, they will be able to spot any abnormalities and rectify them promptly.
1.3 The Roles of Production and Maintenance in Autonomous Maintenance
(1) The roles of production and maintenance
Many maintenance departments adopt a passive, ‘We’ll come when we’re called’ attitude, waiting for a request from the production department before doing any work. But a reactive stance like this is not conducive to achieving good equipment performance. For their part, production departments are naturally anxious for any repairs to be done as soon as possible, as it is their duty to maintain output, but the maintenance staff often get swamped with requests and are unable to deal with them all. If neither department can see things from the other’s viewpoint, it can, in extreme cases, lead to an atmosphere of hostility and distrust, making it impossible for maintenance to meet its purpose.
What is more, if the production department persists in the ‘I make, you fix’ mindset, it will be impossible to achieve satisfactory equipment conditions, no matter how hard the maintenance department works. Any successful manufacturing operation has to get its production and maintenance functions working hand in hand. Only when the production department takes on some of the basic maintenance tasks itself and works in harmony with the maintenance department can the required maintenance functions be fulfilled and the objectives be achieved.
The production department should undertake basic maintenance routines such as cleaning, tightening, and lubricating designed to prevent the equipment from deteriorating. Nothing less than this is required if the maintenance department is to deploy its specialized maintenance resources to best effect and the maintenance function is even to begin working effectively.
(2) Classifying and allocating maintenance tasks
This section sets out the different types of maintenance tasks and explains which fall within the scope of Autonomous Maintenance (see Figure 5.2).

The activities necessary to achieve the maintenance objective can be broadly divided into the following two types:
- ‘Sustainment’ activities: Preventing and correcting equipment failures.
- ‘Improvement’ activities: Prolonging the working life of the equipment, reducing the time spent on maintenance, and eliminating the need for maintenance.
These two types of activity need to be carried out in parallel.
Measures for ‘sustaining’
- Correct operation
- Routine maintenance, periodic maintenance, predictive maintenance
Measures for ‘improving’
- Corrective maintenance: improving equipment reliability and maintainability
- Maintenance prevention: designing out the need for maintenance
These measures can be incorporated into operators’ duties using a three-pronged approach:
- Preventing deterioration,
- Measuring deterioration, and
- Reversing deterioration. Each of the three prongs can be implemented differently, and it is not always necessary to place equal emphasis on all three. However, if any of the three is neglected, it will be impossible to achieve the maintenance objective.
Generally speaking, activities designed to prevent deterioration are the most likely to be overlooked, but they are in fact the single most important strand of maintenance. If the objective is to maintain the equipment effectively, then focusing on periodic inspections and precision checks, without paying proper attention to prevention, is a prime example of putting the cart before the horse.
(3) The production department’s responsibilities
The production department should focus on preventing deterioration, and is responsible for implementing the following activities:
1 Preventing Deterioration
- Operating correctly (preventing human error)
- Sustaining basic equipment conditions (cleaning, lubricating, and tightening)
- Adjusting (mainly during operation and setup)
- Recording data on adjustments required and other abnormalities found
- Planning improvement strategies in cooperation with the maintenance department
2 Measuring Deterioration
- Performing routine checks (mainly five-senses checks)
- Some periodic inspection (mainly five-senses checks)
3 Reversing Deterioration
- Minor servicing (simple parts-replacements, and emergency measures)
- Reporting failures and problems promptly and accurately
- Helping to repair unexpected failures
Sustaining basic equipment conditions (cleaning, lubricating, and tightening) and routine checking is the most important of these activities, and the sheer amount of work involved puts them beyond the maintenance department’s resources. The only way to ensure that these tasks get done effectively is to have them done by production operators, who know the condition of the equipment best anyway.
(4) The maintenance department’s responsibilities
1 Core maintenance activities
The focus of the maintenance department’s activities is measuring and correcting deterioration. Maintenance staff needs to concentrate on fields requiring specialist skills, such as periodic maintenance, predictive maintenance, and corrective maintenance. They must play a wide-ranging, active role in raising maintenance and safety standards, going far beyond their traditional remit as repairers of machines and replacers of parts.
2 Support for the Autonomous Maintenance program
As described above, one of the key responsibilities of the production department is to set up an Autonomous Maintenance program aimed at preventing and correcting deterioration, but it can only do so with effective guidance and assistance from the maintenance department. The production and maintenance departments must cooperate and learn from one another, and the production department should turn to the maintenance department for the following help:
Backup for Autonomous Maintenance Steps 1 to 3
- Teaching operators how the equipment works, what the parts are called, and which sections of the equipment they should not disassemble.
- Training operators how to lubricate their machines, standardizing the types of lubricant to be used, and helping operators formulate lubrication standards (what needs to be lubricated, which lubricant should be used, how often, and so on).
- Providing technical help with improvement activities such as eliminating contamination sources, making areas more accessible for cleaning, lubricating and inspecting, and boosting equipment effectiveness.
- Responding promptly to requests for maintenance work needed to rectify things such as deterioration, deficiencies in basic equipment conditions, and equipment problems.
Backup for Autonomous Maintenance Steps 4 and 5
- Coaching operators in techniques for tightening nuts, bolts, and other fastenings.
- Training operators in inspection skills, and helping them formulate inspection standards (what to inspect, how often, and so on).
1.4 The Seven Autonomous Maintenance Steps
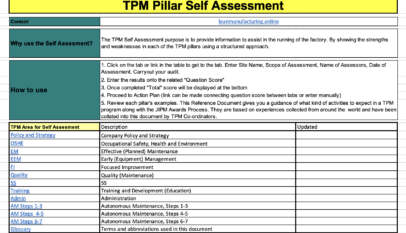
If it is going to work properly, Autonomous Maintenance must be implemented following a management-led plan. A system for progressively upgrading production equipment and operators’ capabilities should be put in place (see Table 5.1), and the Autonomous Maintenance program should be rolled out under this plan, with each step being reviewed by management before an authorization is given to proceed to the next.

1.4.1 The 7 Autonomous Maintenance Steps
The 7 steps for developing Autonomous Maintenance can be grouped into the three stages described below:
Stage 1
Steps 1 to 3 constitute Stage 1. This is where the basic equipment conditions are painstakingly achieved (mainly through cleaning and inspecting), and a system for sustaining these conditions is established.
Everyone should be helped to understand the process that is going to transform their equipment as they implement Autonomous Maintenance. They need to discover truths like the following:
During this process, everyone needs to get into the habit of working through difficulties, exercising creativity and ingenuity in solving problems, and thinking hard about what they are doing and why they are doing it. The work carried out at this stage will revolve around three activities: cleaning, lubricating, and tightening. These activities, through which basic equipment conditions are sustained, are the minimum prerequisites for preventing equipment deterioration and form the foundation on which all the other activities are built.
Stage 2
Steps 4 and 5 constitute Stage 2. At this stage, operators receive training in general equipment inspection skills and start performing these inspections for themselves. This enables them to move on from preventing deterioration to measuring deterioration, and learn that:
Through this, the operators become truly equipment-competent, capable of performing routine checks using their five senses backed up by logic, and able and willing to make improvements on their own initiative. This is the stage at which the results really start to appear, and people’s attitudes change. These new attitudes produce a new atmosphere, as operators start to take pride in the smooth running of their equipment, while defects and breakdowns are seen as letting the side down. This is a crucial part of creating a true system of self-management.
Stage 3
Stage 3 consists of Steps 6 and 7. This is the stage at which the finishing touches are put to the Autonomous Maintenance program by completing the process of standardization and self-management begun in the previous steps, and operators work towards perfecting their maintenance skills. The key processes here are as follows:
These processes transform the operators and the workplace, and self-management kicks in as a result.

2. Step-by-Step Development
To reach the desired scenario of highly-productive equipment, and operators who know their equipment well and are capable of managing their own work, Autonomous Maintenance is implemented progressively, starting with preparation (Step 0) and proceeding through a further seven steps.
2.1 Step 0: Preparation
2.1.1 Aims
This is an important step, where operators find out for themselves that bad things happen as a result of forced deterioration of equipment. This is how they come to realise why TPM is necessary. Note that action comes first, and motivation grows out of the action process. To become motivated, the operators first have to carry out the prescribed actions. This preparatory step is designed to make the operators think about the causes of forced deterioration, and understand why they are now embarking on Autonomous Maintenance.
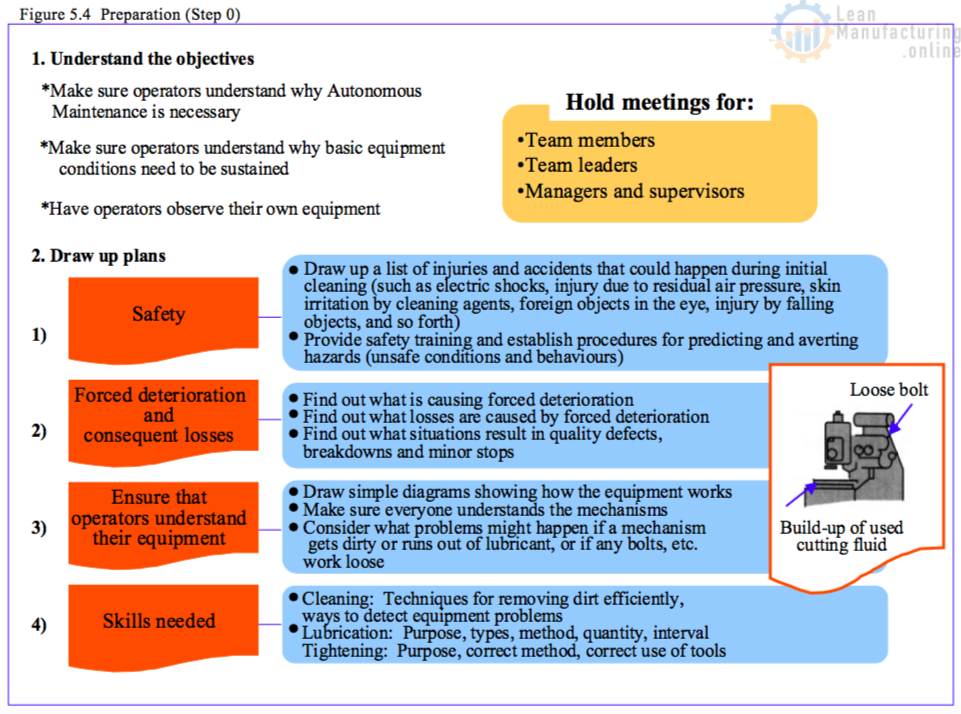
- Injuries and other mishaps that could occur while implementing Step 0 should be thought through, and thorough safety training given. The unsafe actions and situations that could occur as a result of carrying out the initial cleaning will need to be listed, and a preventive strategy formulated for each.
- Have each team discuss the implications of forced deterioration, think about why their equipment has got into the state it is in, and work out what losses result from breakdowns and quality defects caused by forced deterioration.
- Have operators draw simple diagrams illustrating the mechanisms used by their equipment. Help them understand how their equipment works and what kinds of problems happen when it gets dirty, learn the names of the parts, and so forth.
2.2 Step 1: Initial Cleaning (Checking through Cleaning)
2.2.1 Aims
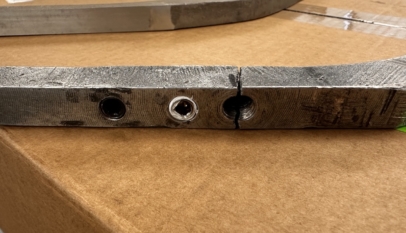
This is a crucial step, at which the ‘cleaning is inspection’ concept is put into practice. It is not a matter of just making the equipment look clean on the surface; the process of cleaning exposes abnormalities, such as leaks, loose fastenings, or damaged parts. The aim of this step is to get to grips with the equipment, getting our hands dirty and removing every last bit of dust or grime and keeping our eyes open as we do so, because this is by far the best way of discovering problems.
Since initial cleaning is a key step in which the equipment is cleaned thoroughly to make any abnormalities visible, it is also called ‘Checking through Cleaning’. By carrying out this step, operators not only get their equipment clean and find out what is wrong with it; they also experience for themselves, in a very practical way, that cleaning and inspection are actually the same things.
When embarking on an Autonomous Maintenance program, it is important to ensure that everyone taking part understands exactly just what cleaning really means, so this topic will now be discussed in a little more detail.
(1) What is cleaning?
Basically, ‘cleaning the equipment’ means exactly what it says: removing all foreign matter, such as dirt, dust, oil stains, swarf, sludge, and so on, from the machinery, molds, tools, jigs, and other equipment used to make the product. Getting every last corner of the equipment thoroughly clean is the best way of revealing hidden defects, as emphasized by the slogan ‘cleaning is inspection’. It is not a cosmetic exercise; only a real ‘deep clean’ will do the job. Less-than-thorough cleaning leads to a host of harmful effects, some of which are noted in Table 5.2.

(2) Cleaning is Inspection
We describe this approach as ‘Cleaning is Inspection’ because it aims to discover as many equipment abnormalities as possible. Painstakingly cleaning the equipment like this, touching every nook and cranny, often reveals hundreds and hundreds of minor defects.
Key Points
- Always check safety conditions carefully before starting to clean.
- Operators should really get involved and see cleaning as an integral part of their job.
- Remove every last bit of built-up grime.
- Eliminate dust and dirt from every corner of the equipment. To do this, operators should open up covers and flaps that they have never looked under before.
- Cleaning should not be confined to the main body of the equipment. The exteriors and interiors of peripheral devices such as conveyors, fuse boxes, and hydraulic fluid reservoirs need to be cleaned as well.
- Operators should not give up if their equipment gets dirty again as soon as it has been cleaned. They should observe it to see where, when, and how much dirt starts to appear again.
2.2.2 Implementation
Key Points
(1) Give the basic instruction required for carrying out Step 1
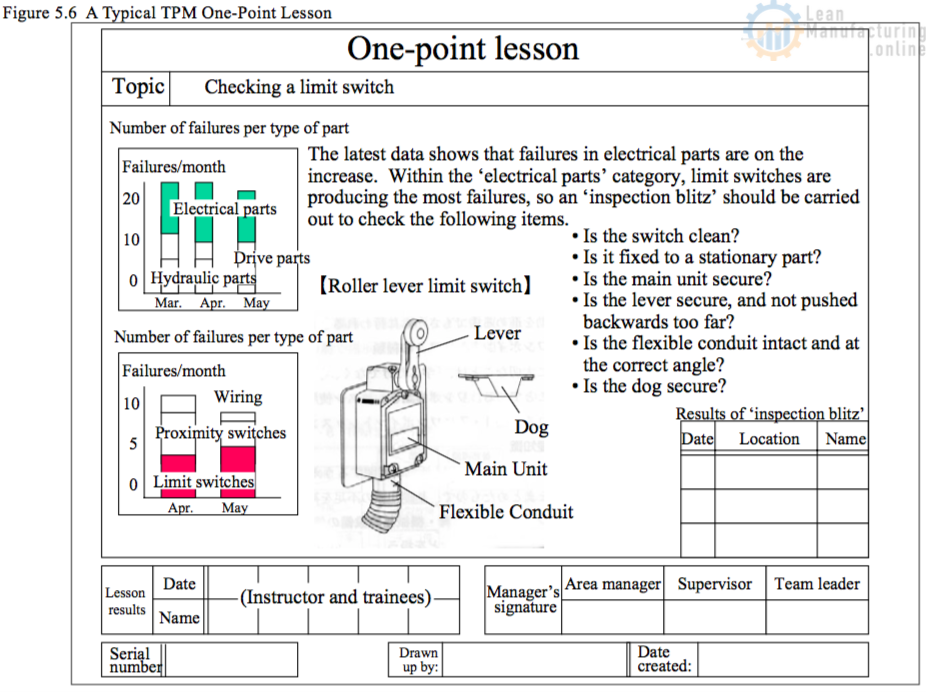
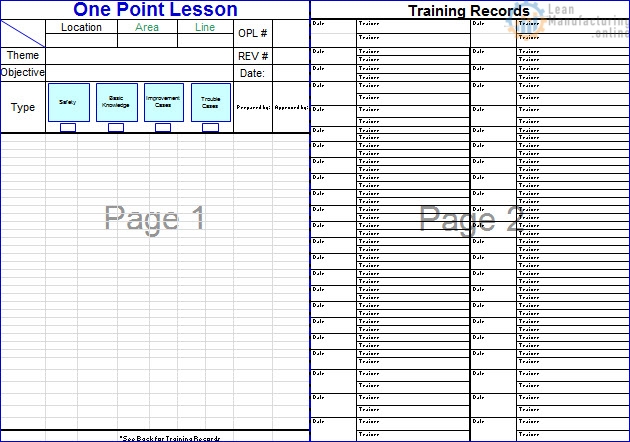
Operators must be trained so that they properly understand the safety requirements, how their equipment is constructed and how it works, and how to perform tasks such as checking, lubricating, and tightening. This training must be kept practical, through the use of one-point lessons (see Figure 5.6), or shop-floor practice sessions using the actual equipment.
(2) Create a cleaning plan
By drawing up a cleaning map and using some kind of ranking scheme to decide what order the equipment should be cleaned in, a cleaning plan can be prepared showing the cleaning procedure to be followed. The plan should cover 5-S activities, and list the tools and materials that will be required.
(3) Remove all unnecessary objects
Begin by scouring the entire work area (not just the equipment and its immediate surroundings) for unnecessary objects, and removing them. Freeing up space in this way is an essential preliminary step in initial cleaning.
(4) Do initial cleaning
To detect abnormalities and defects, operators need to scrutinize their equipment, touch it, feeling it, and moving the working parts. They should use all of their senses to detect problems, such as play, looseness, wear, misalignment, vibration, irregular noise, overheating, oil leaks, and so on. They should pay particular attention to the parts that give them concern on a day-to-day basis.
(5) Find sources of contamination
Any sources of contamination that cause the equipment to become dirty again after cleaning must be clearly identified, and everyone should be impressed with the need to deal with these so that the equipment stays clean.
Figure 5.5 illustrates the overall workflow for this step, and Figure 5.7 shows further details.


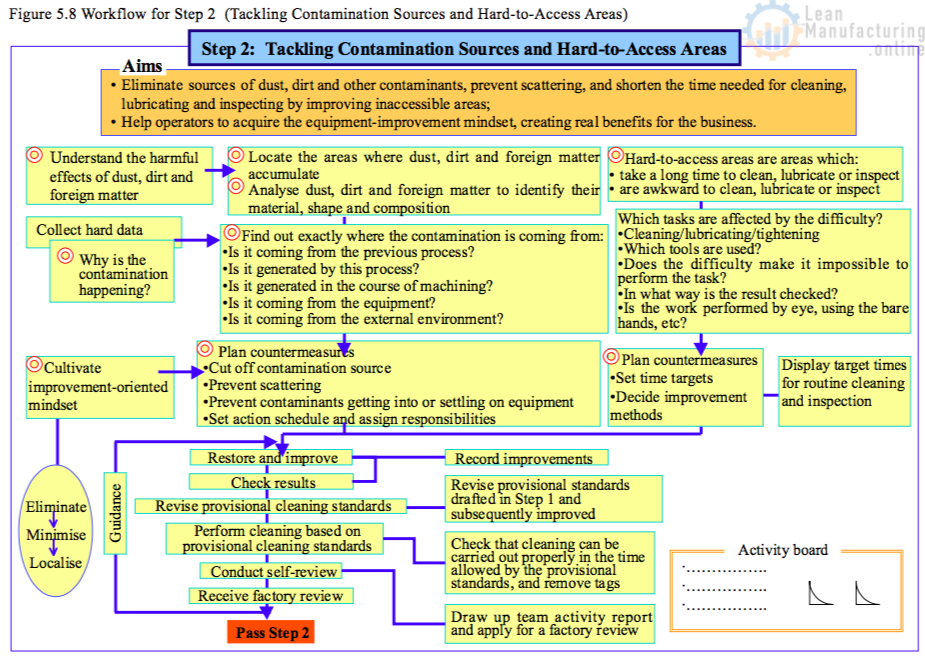
2.3 Step 2: Tackling Contamination Sources and Hard-to-Access Areas
2.3.1 Aims
In Step 2, ways are found to combat sources of dirt, leaks, and so on, and improve accessibility to areas that are hard to clean, lubricate, tighten, or inspect. This is a crucial process that nurtures the seeds of improvement, as operators find ways to improve the situation on their own initiative. It allows them to derive real pleasure from the process of improvement and the results attained, and to share a sense of achievement with their supervisors and fellow team members.
The aim is to enable operators to improve their equipment themselves and give them the confidence to take on more and more advanced improvements.
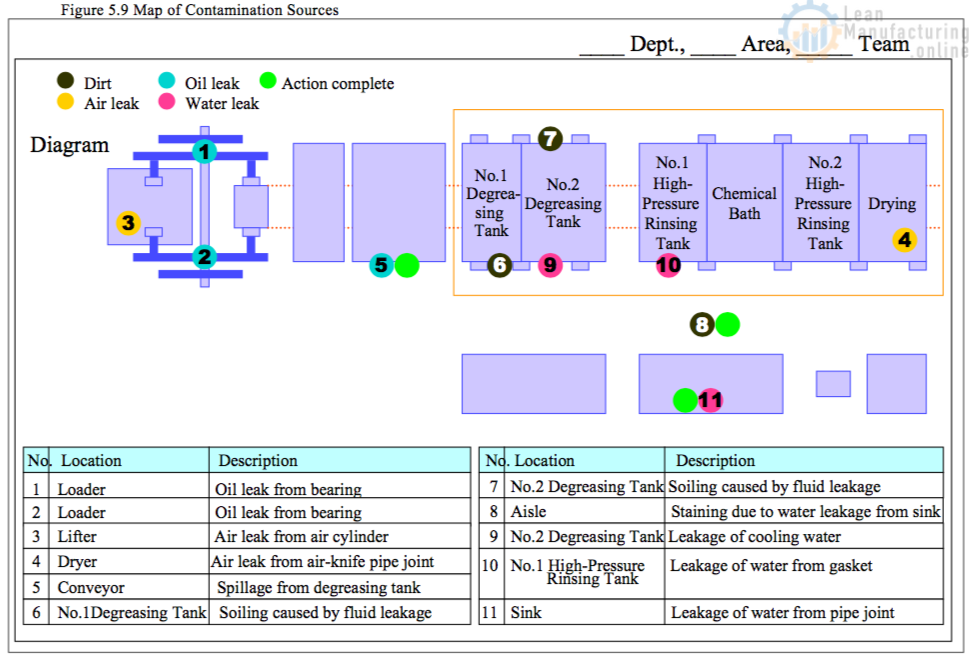
(1) Eradicating contamination sources
Eradicating contamination sources means identifying sources of dirt or leaks (of air, oil, raw materials, etc.) and then getting rid of them. To do this, a map of sources must be drawn up showing each point where contamination or leakage is occurring, so that they can be addressed systematically, starting with those that have the greatest effect on quality, equipment performance, and the general work environment (see Figure 5.9).
Contamination sources are identified in Step 1, but in Step 2 they must be painstakingly rooted out. For instance, all sources of oil stain must be eradicated by measures such as preventing leaks in hydraulic pipe joints, or adjusting drip rates if too much lubricating oil is being applied.
Some contamination sources cannot be eliminated. For example, the use of cutting fluid, or the generation of swarf or scale, may be unavoidable, and in these cases, practical improvements must be made to minimize the dispersion of these contaminants. Here, the basic approach is to prevent scattering.
(2) Tackling hard-to-access areas
Areas that take great time and effort to clean and inspect must be improved to make them more accessible. For example, it is difficult to drain and check FRLs (compressed-air filter/regulator/lubricator sets) located near floor level, so these units should be raised to make the tasks easier to carry out. Similarly, providing an observation window makes it possible to check the state of a V-belt from the outside, without having to remove the cover. Likewise, complex, tangled cable layouts should be eliminated, and cables laid directly on the floor should be raised, make cleaning easier.
Implementation
Figure 5.8 shows the rollout procedure for Step 2.
Tackling contamination sources is a key part of Step 2. It is worth looking a little further at this subject and how to approach it.
2.3.2 Tackling contamination sources
Tackling contamination sources involves two key approaches.
(1) Nurture the seeds of improvement
The harder operators work on initial cleaning in Step 1, the less willing they will be to let their lovingly-cleaned equipment become dirty again. They will naturally be much more aware of contamination sources and keen to find ways to eradicate them. It is essential to make the most of this opportunity.
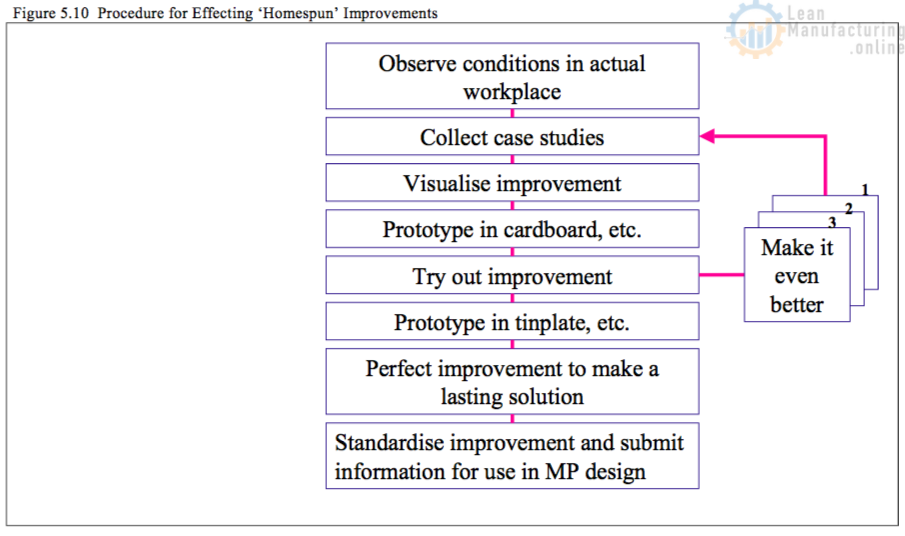
- Rather than spending a lot of money on a few grandiose schemes, it is much better to accumulate larger numbers of smaller, ‘homespun’ improvements. Figure 5.10 shows a typical approach to making this kind of improvement.
- Establish an effective support system and training facilities. Explain the principles of the processes involved, and teach operators how to spot where the equipment functions can be improved. Show them crafts and techniques they can use to come up with effective improvements. All training should be carefully geared to the operators’ capabilities.
- It is most important for supervisors and managers to boost morale by taking a real interest in these improvements, visiting the workplace regularly to see them for themselves.
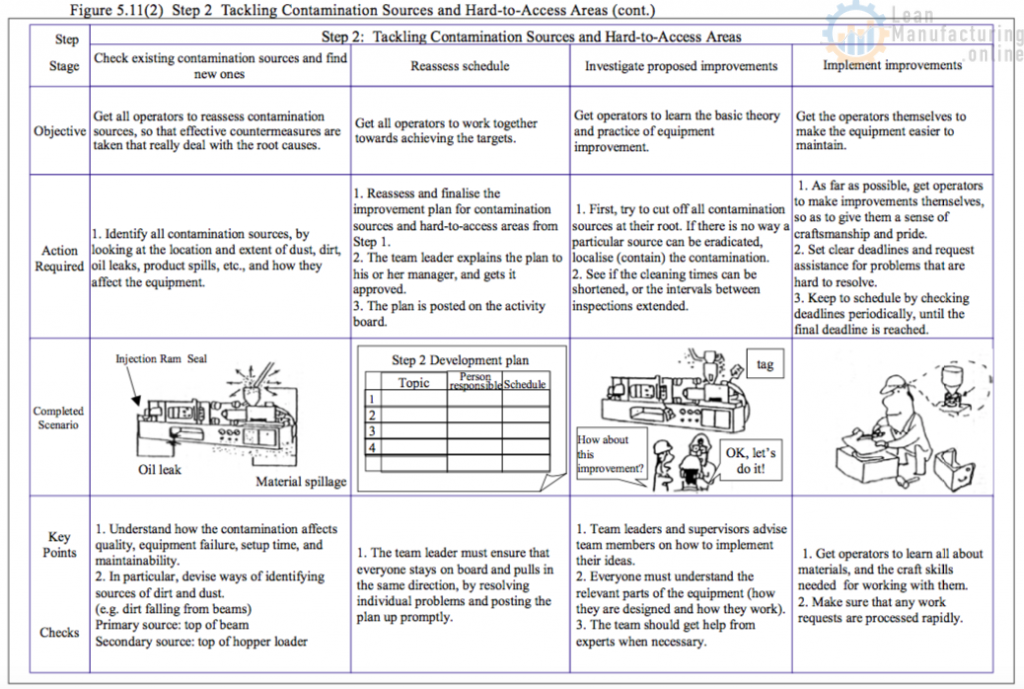
(2) Create provisional standards for cleaning and lubrication, based on improvement case studies
Figure 5.8 shows the general approach for this, and Figure 5.11-(1) and (2) gives further details.

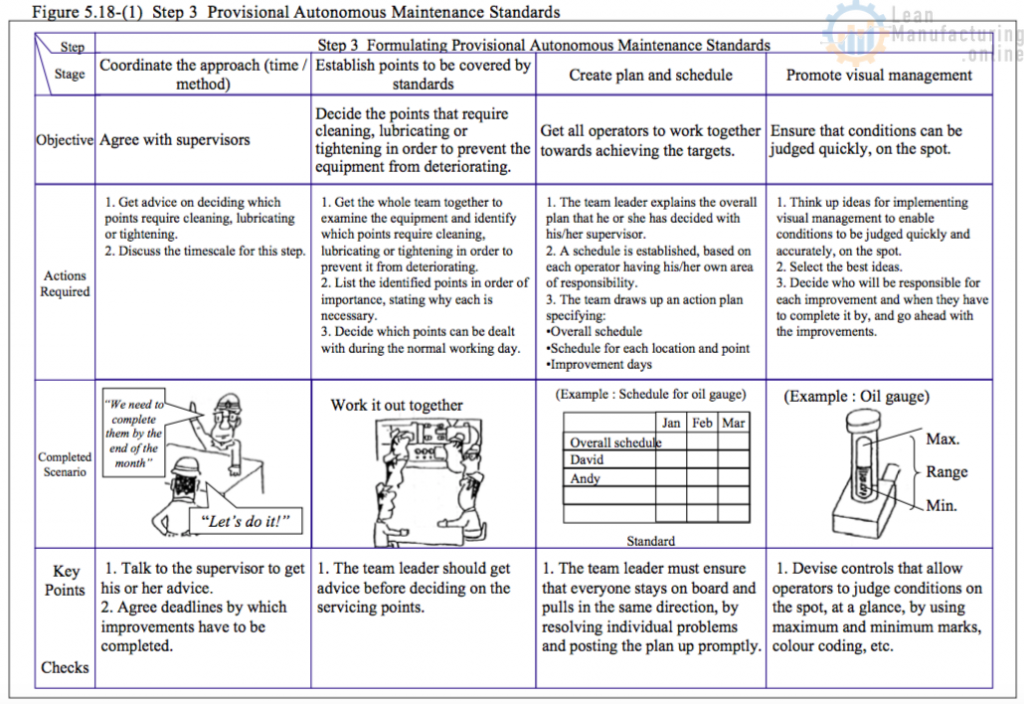
2.4 Step 3: Provisional Autonomous Maintenance Standards
2.4.1 Aims
Based on the experience gained from Steps 1 and 2, the purpose of Step 3 is to
• Sustain the level of cleanliness achieved on passing Step 1; and
• Sustain the equipment improvements made in Step 2 to deal with contamination sources and hard-to-access areas
To do this, provisional standards for cleaning, checking, and lubricating must be formulated. Lubrication standards are drawn up by checking current lubrication practice and the state of lubrication of the equipment; identifying any problems, or areas that are hard to lubricate or check properly, and taking action to rectify these. The aim is to improve equipment reliability and maintainability by creating easy-to-follow standards.
2.4.2. Implementation
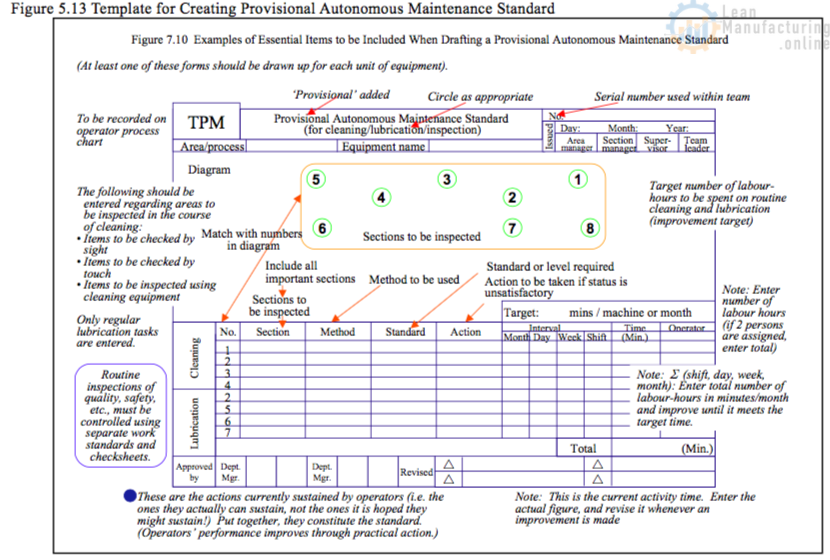
Step 3 is an important step in which operators use the experience they have acquired in Steps 1 and 2 to clarify what the ideal conditions for their equipment should be, and devise standards for the actions necessary to sustain those conditions (standards specifying the 5 Ws and 1 H, i.e. who is to do what, where, when, why and how). Figure 5.13 shows a typical template for creating a provisional standard, and Figure 5.14 shows a detailed example. The key points for this step are discussed below.
Key points
(1) Why are standards not usually followed?
Companies often have a huge number of work standards and inspection standards, thought up by technical staff sitting in an office somewhere, that is not very relevant to the situation on the shop floor. The operators do not understand why they are necessary and are simply obliged by their managers to observe them. Before creating the provisional Autonomous Maintenance standards, a full inventory of existing standards must be taken to get a clear idea of the current situation.
(2) Establish standards that can be followed
The following points must be observed if standards are to be properly applied:
- The conditions to be sustained, and the methods to be followed, must be made explicit.
- The reasons why these conditions need to be sustained, and the negative consequences of not sustaining them, must be fully understood.
- The operators concerned must be given the capabilities needed to sustain the conditions.
- The prerequisites (such as sufficient time, etc.) for sustaining the conditions must be made available to the operators.
(3) Standards must be defined by those who have to observe them
To ensure that basic equipment conditions are reliably sustained, it is important to let those responsible for sustaining them define the necessary standards. This is in fact the first step towards self-management. To this end, the following requirements must be met
- The operators must be taught why they need to set and follow standards.
- They must be helped to acquire the ability to formulate the standards themselves.
- They must actually be allowed to formulate the standards themselves.
If this is done, the standards prepared by the operators will be sustained. See Figure 5.12 for details.


2.4.3 The difference between visual indicators and visual controls
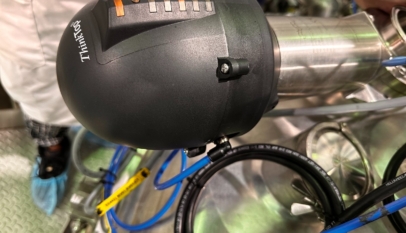
The diagrams below show the basic difference between visual indicators (Figure 5.15) and visual controls (Figure 5.16). This example relates to an FRL (filter, regulator, lubricator set) for a pneumatic device, and in particular, to its lubricator. The purpose of the lubricator is to hold the prescribed type of oil and supply it at the right time and in the right quantity to the downstream pneumatic device (e.g. a pneumatic cylinder or solenoid) where it is needed. The key function of the lubricator is not so much that of holding the oil, as making sure that it is supplied where and when required, in the right amounts.
In the example in Figure 5.15, the maximum and minimum levels are marked on the lubricator bowl, and the oil level is periodically checked to see if it still lies between these marks. It is easy to see whether or not the lubricator is holding the correct amount of oil, but this in itself will not prevent equipment failures or minor stops. This is because the level indicators cannot tell us whether or not the lubricator is fulfilling its real function, which is to supply the right amount of oil where and when needed.
To summarise:
• Visual indicators provide a guide for monitoring the item under observation.
• Visual controls make abnormalities in the actual function performed by the item under observation visible.

Figure 5.16 shows an example of how this problem can be solved, by placing a rubber band around the bowl in line with the oil level. If the level has dropped far enough below the rubber band the next time the level is checked, this demonstrates that the lubricator has been working properly.

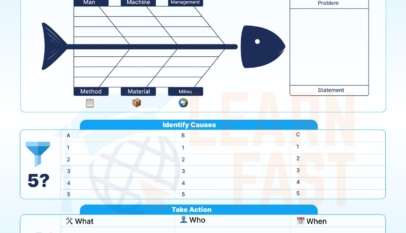


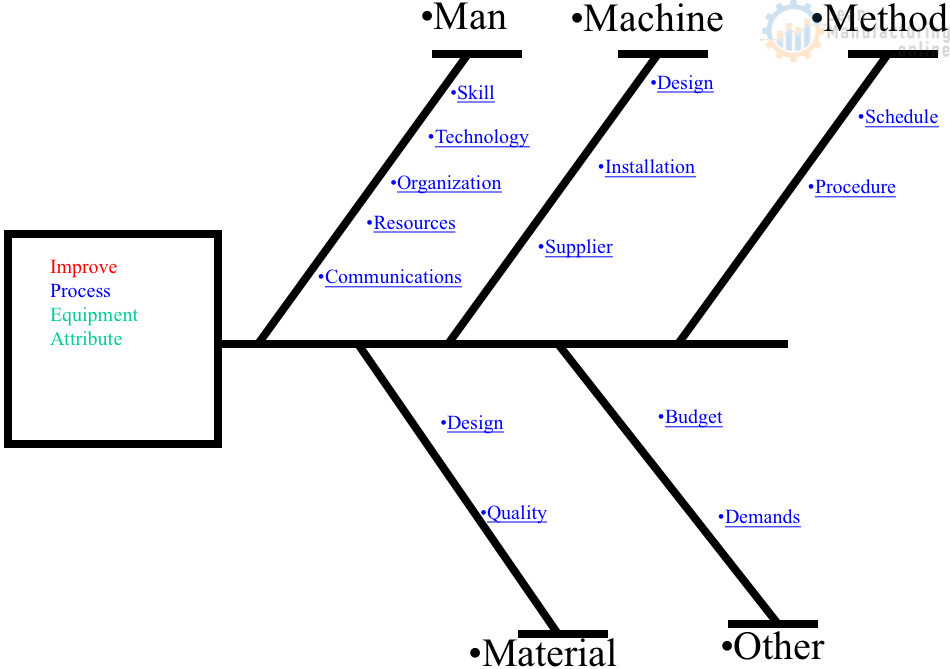
4M Analysis Process: Root Cause Guide for Manufacturing
Learn how to use 4M Analysis to find manufacturing root causes across People, Machine, Method, and Material with diagrams, examples, and checklist.

We have a huge gap in production team training and need to develop one. What tools would you recommend?
Thanks for your question. You can start with Skills Matrix development. Let us know if you need more help.